Monday, December 31, 2012

Happy New Year!

2013 wall calendar
2013 Wall Calender
Happy New Year Everyone! 
I hope you all had a wonderful Christmas!
2013 wall calendar
We sure have had a nice Christmas here!
The lil break from the computer has been lovely... 
...and I don't think I am ready to hop back to it just yet. :)
So, I'll excuse myself just a lil longer, and snuggle with my lil ones some more!!

Thanks for checking in! :)
-Sylv

Friday, December 21, 2012

The Healthy Gingerbread House

Ok, healthIER! :) 
The little Livs and I had fun making "gingerbread houses" from graham crackers, peanut butter, cereal, nuts, and yes, a few marshmallows and chocolate chips too! :) 
In the past, I have cringed at the amount of sugar they wolf down while making (and eating) their gingerbread houses! 
This year, I didn't mind at all if they ate the whole thing in one sitting! :)

Sylvie


Tuesday, December 18, 2012

DIY Felt Star Ornament Photo Tutorial

These stars are hung over my curtain rods so they hang against my curtains. I like Christmas decorations that are simple and neutral. :) 

Have fun! 
-Sylvie :)

Monday, December 17, 2012

DIY Gift Idea Fabric Ball From Scraps

Here I am, making gifts out of scraps again!
These were super fun to make, and toddlers and babies love them!

She includes a printable template, making these very easy!
I added a jingle bell inside for extra fun. :)

Sylvie

Saturday, December 15, 2012

DIY Mustache Set Tutorial Christmas Idea

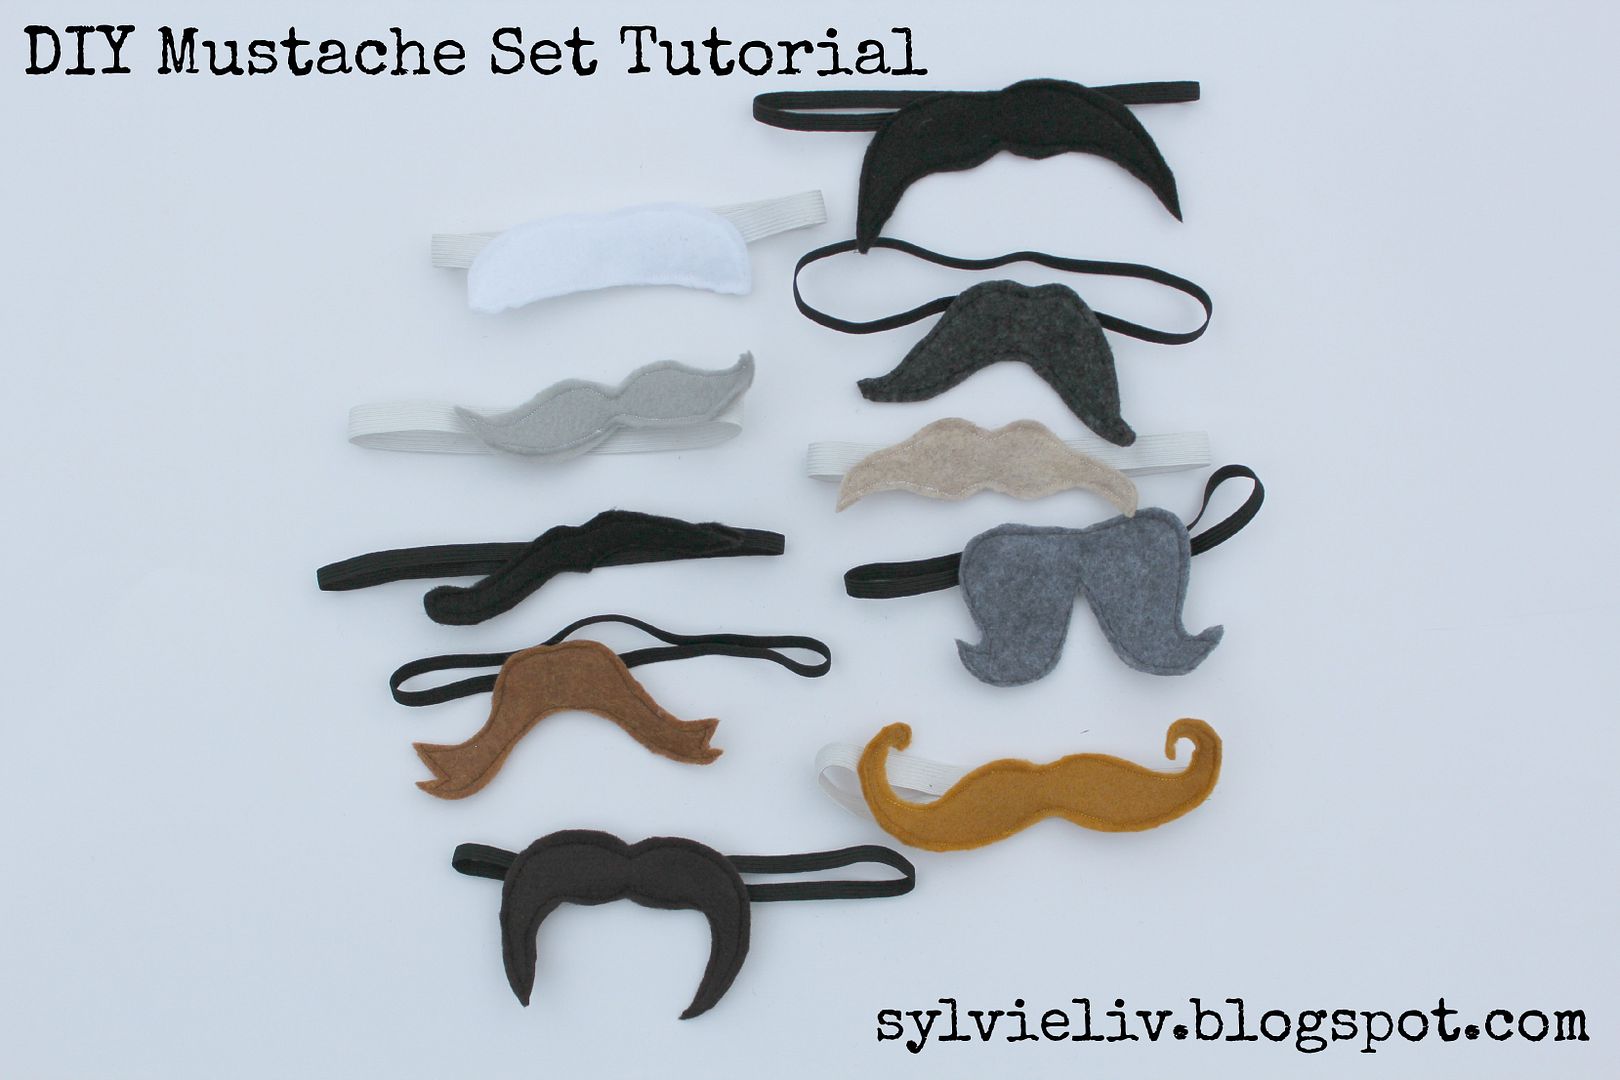
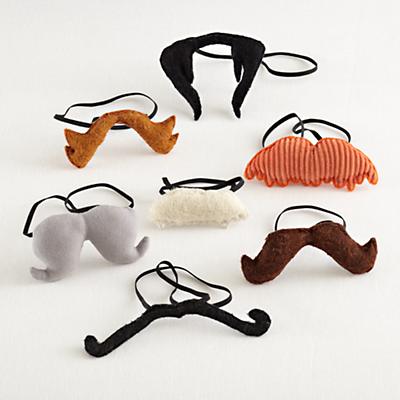
What little guy wouldn't have fun with a mustache set!?
I'll admit I had to try on a few, and had Mr. Liv try one out too! :)

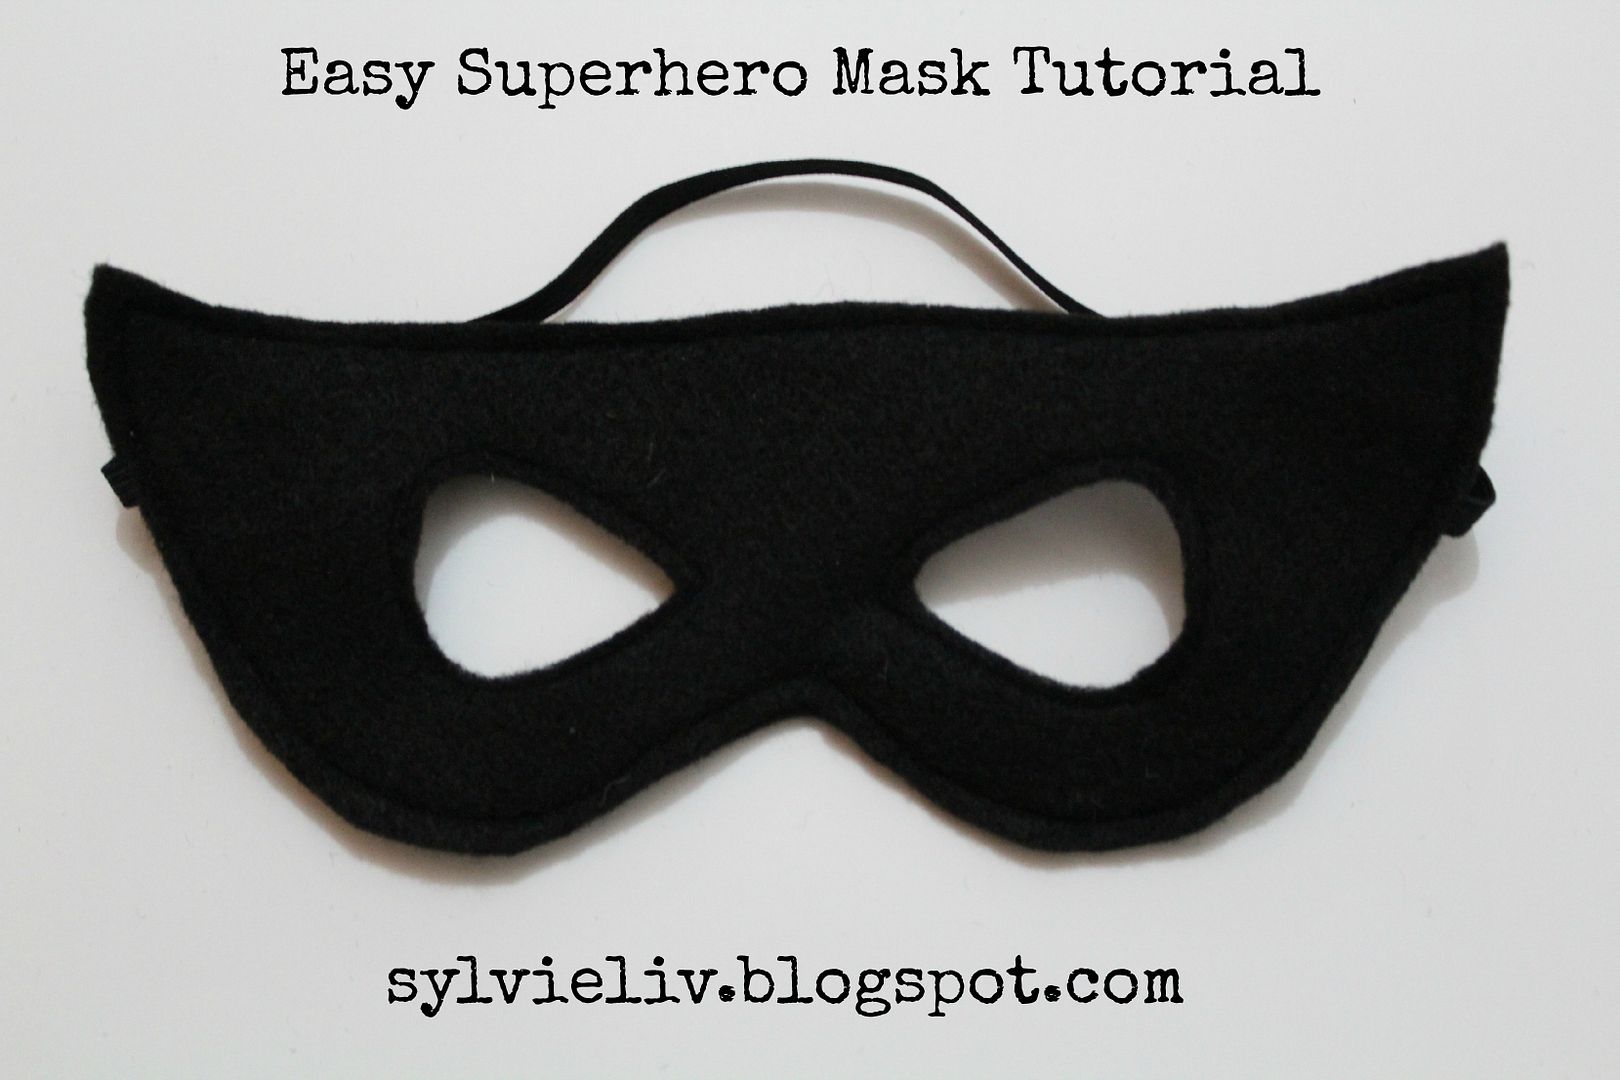
These are super simple to make! Want to make a set?

You will need:
Cardstock
Felt Scraps (choose what colors you like)
Fabric Scissors
Thin Elastic (more or less, depending on how many you want)
Sewing Machine w/ Coordinating Thread

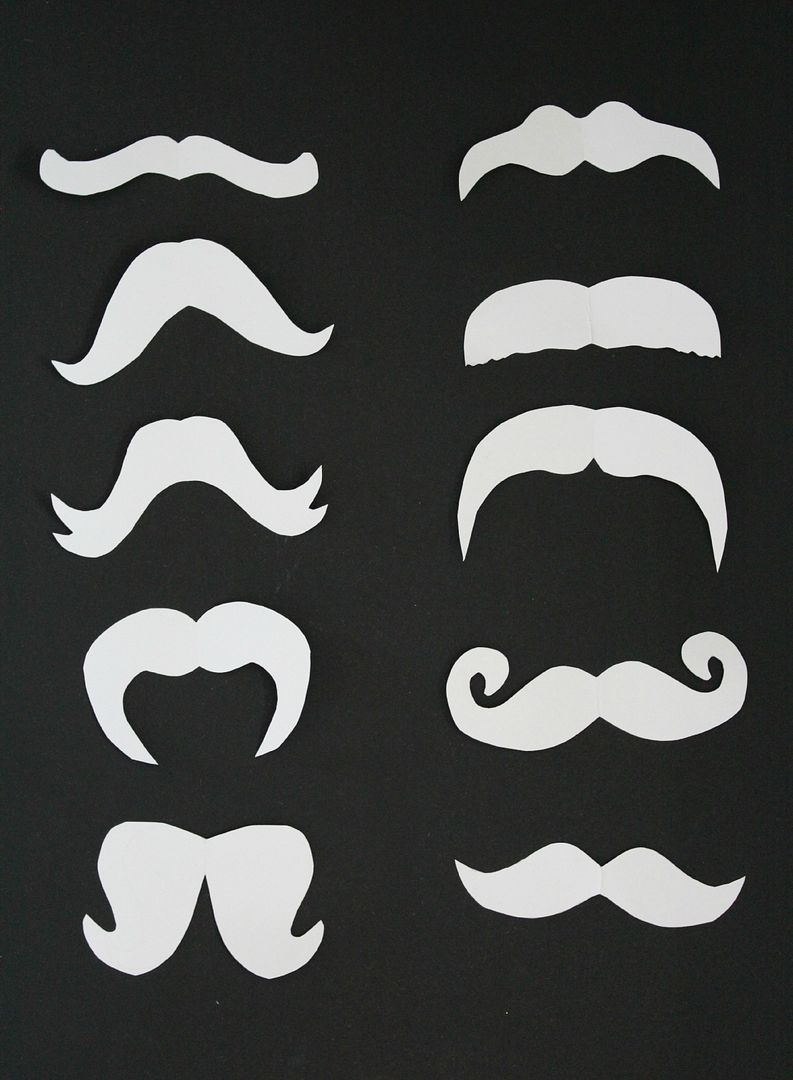
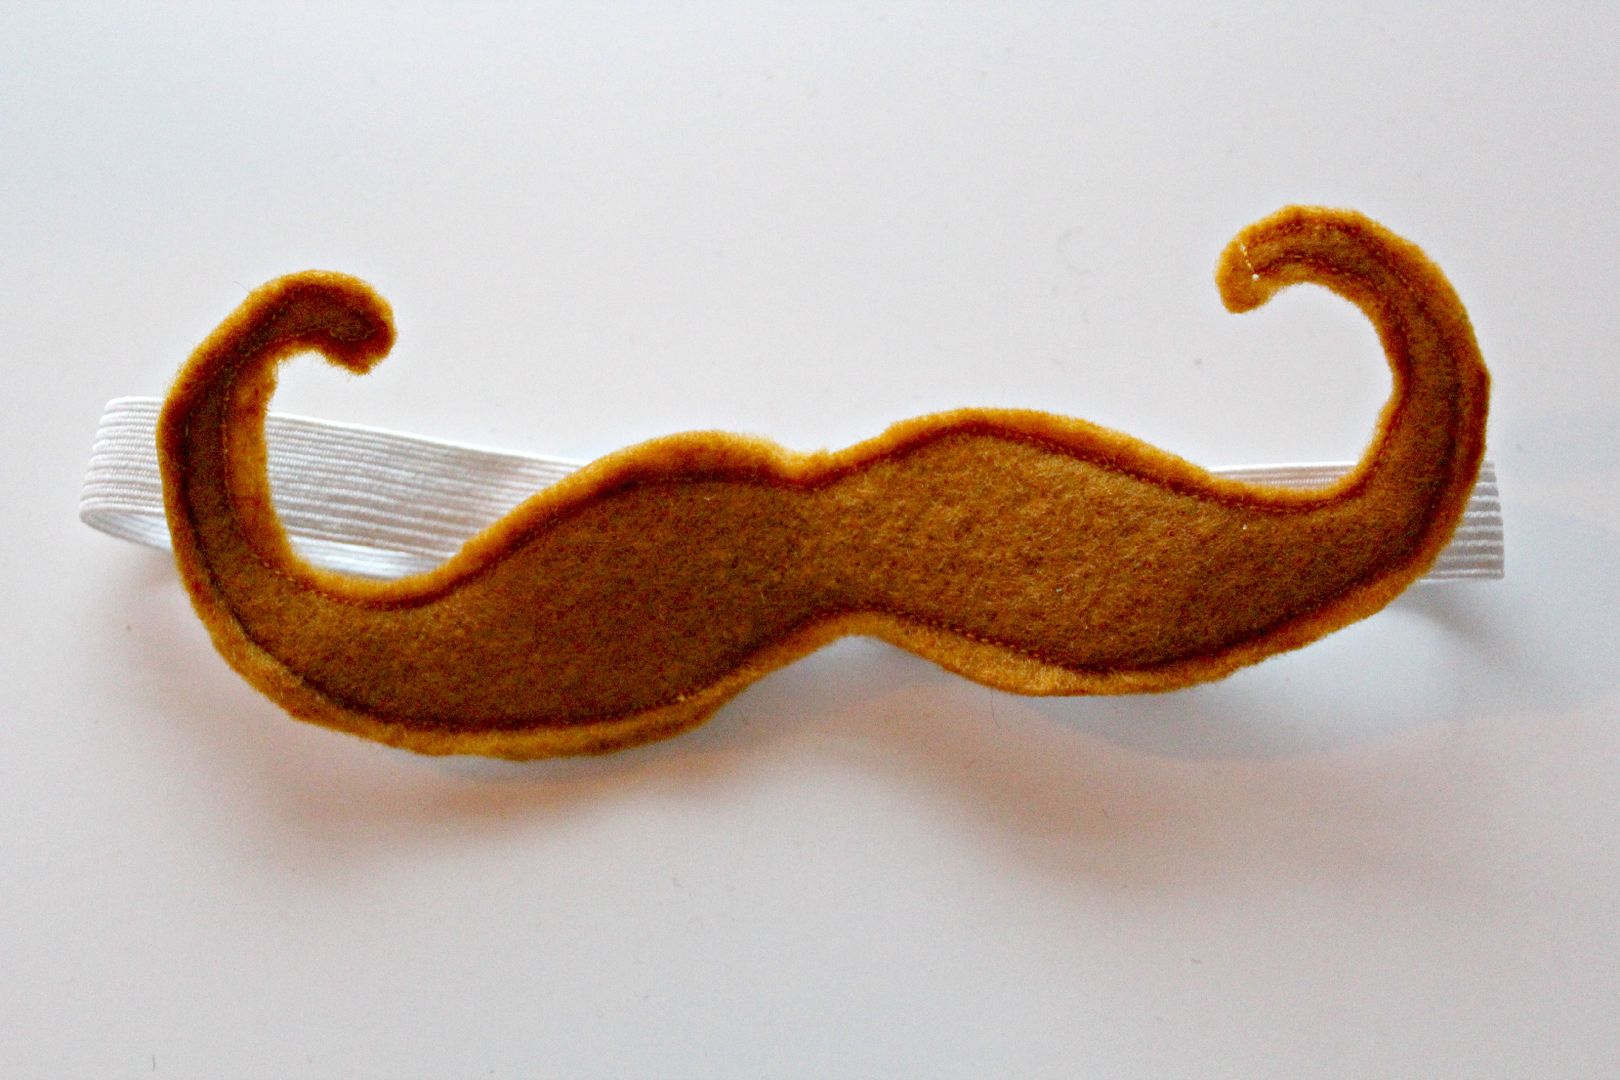
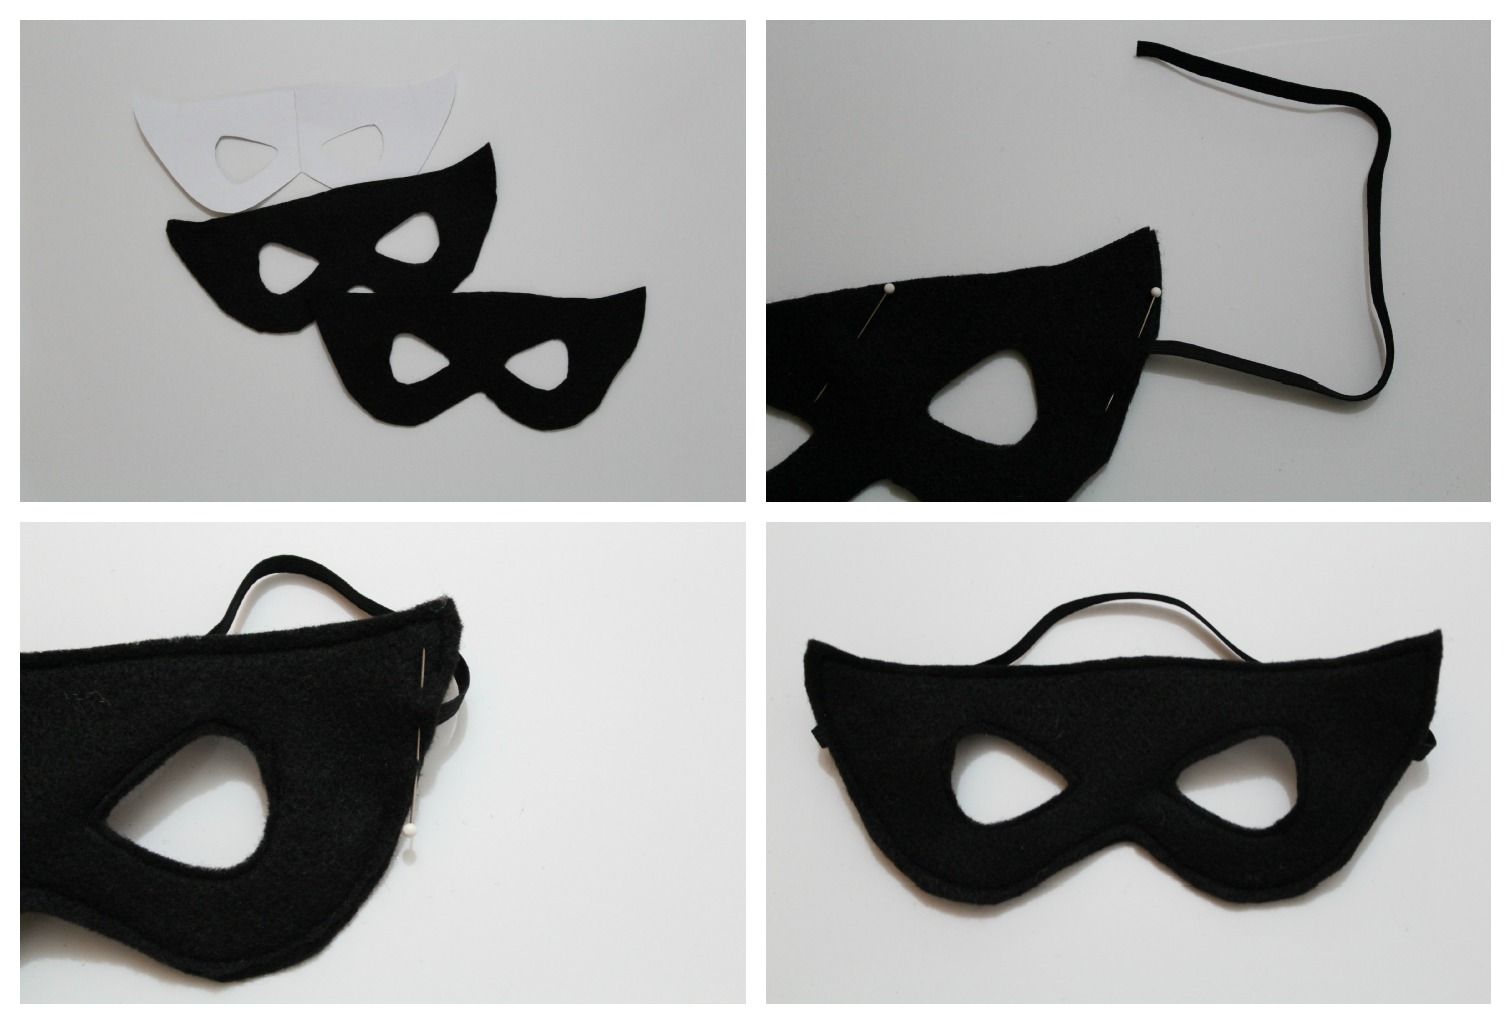
First, cut mustache shapes from card stock. 
I just used Google Images "mustache silhouettes" to get ideas.
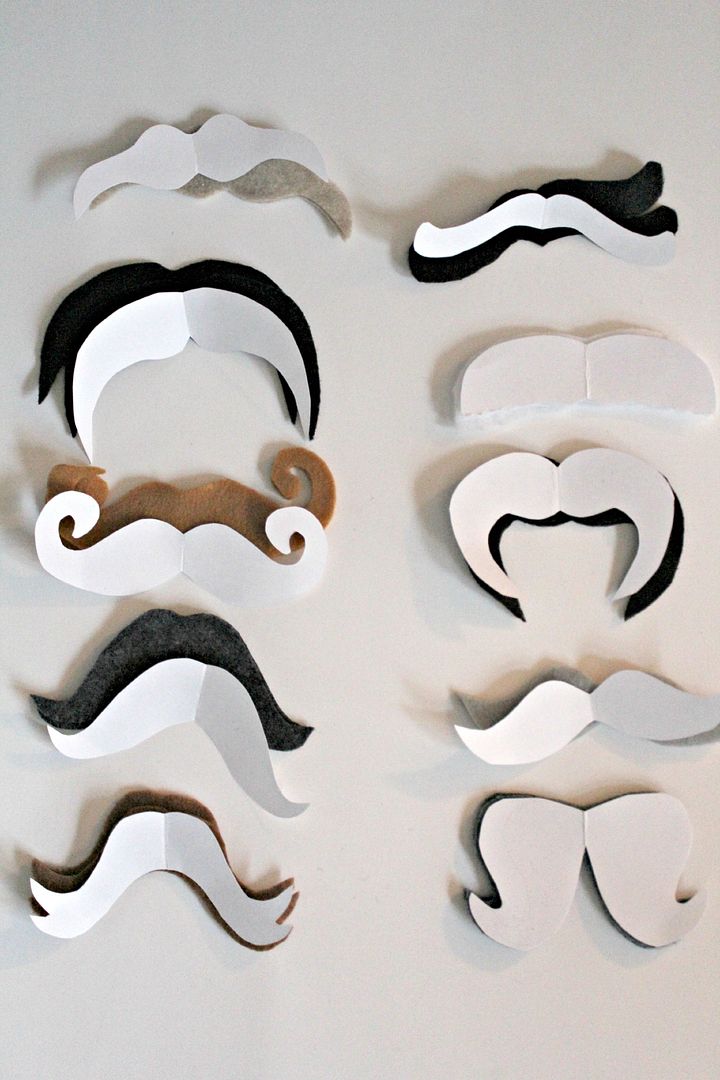
Then stack two pieces of felt with a mustache cutout on top, and cut the felt around the card stock.
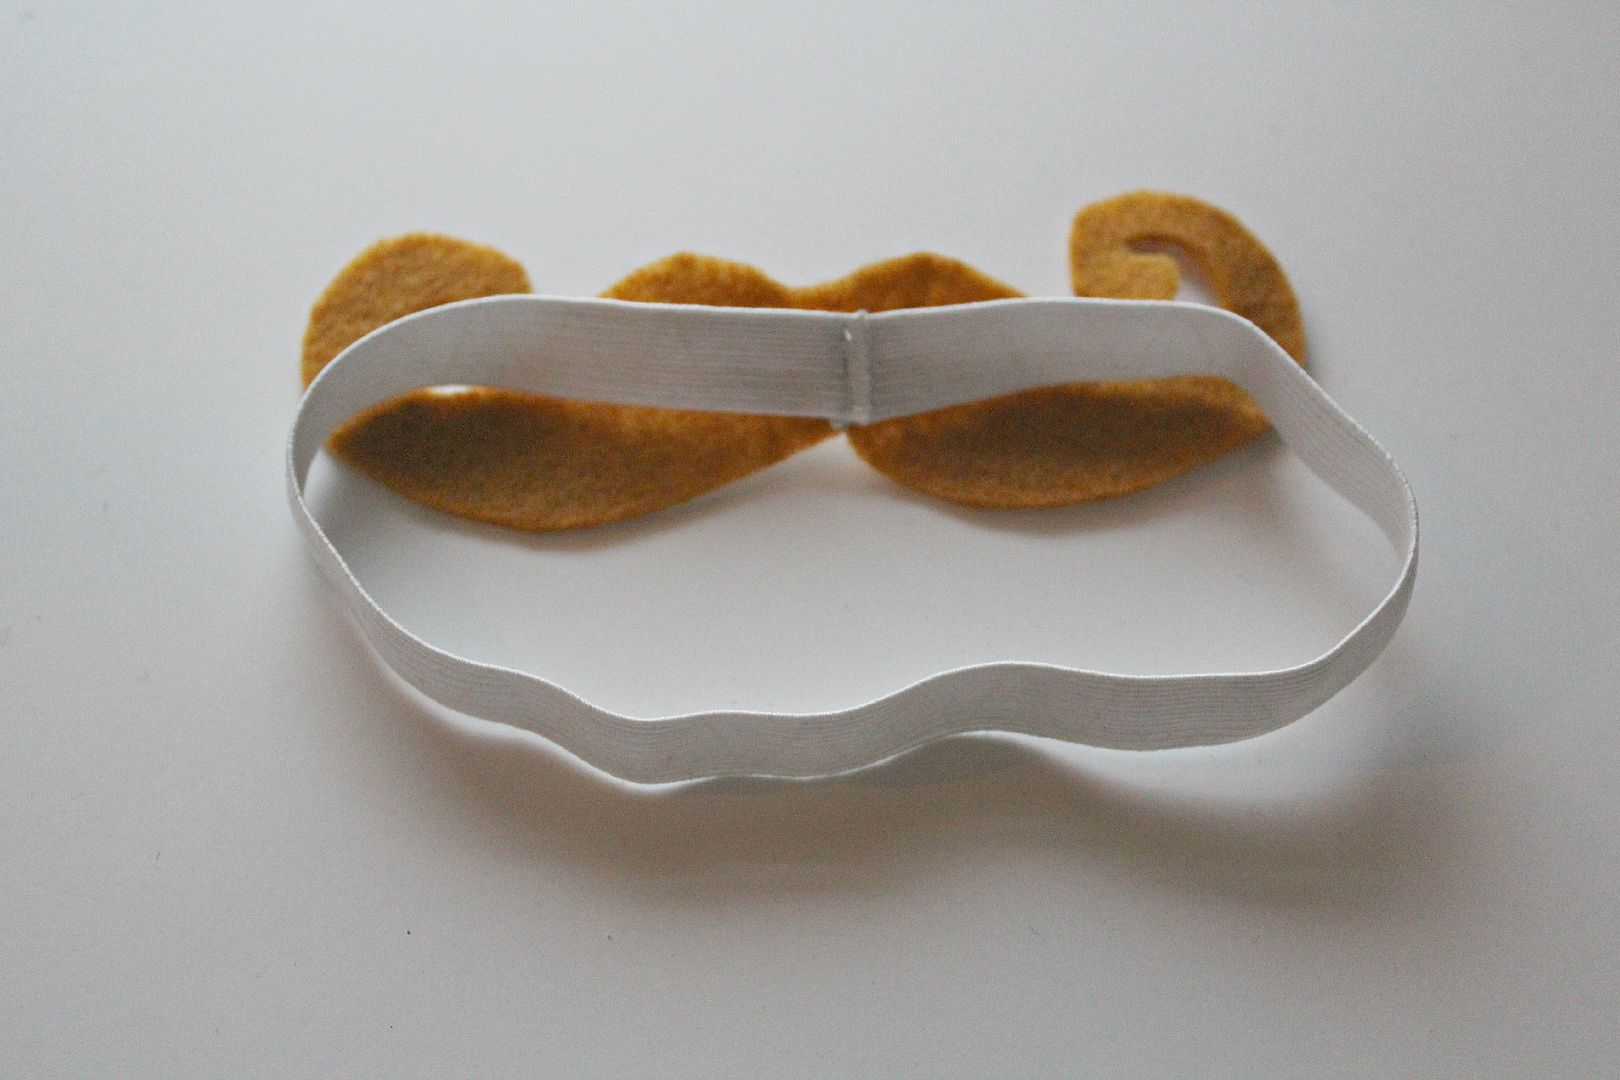
Next, cut an 11" piece of elastic, loop it into a circle, and sew it to the middle of one piece of felt. Use a zigzag stitch, and be sure to back stitch.
Lastly, pin the coordinating piece of felt to the front, and sew around the edges of the felt, using an 1/8 inch seam.
Trim threads and edges, and you are finished! :)
Or, if your not interested in making them, you can buy these mustaches here from The Land of Nod. They are $6.95 each. 
Imaginary_Moustache_Group
I probably spent less than that on the whole set! 
I used scraps I had, and 2 packs of elastic from Walmart.
Happy sewing! :)

Sylvie


Friday, December 14, 2012

Fabric Scrap Gift Idea: Stuffed Penguin DIY

The Purl Bee Penguin is a sweet gift for a child of any age! 
They are small enough that you can use fabric from your scrap bin!
And the tutorial from Purl Bee is super easy to follow! 
I had fun watching scraps turn into cute lil penguins, 
and my kids all think they are great! :)

Have fun!
-Sylvie


Thursday, December 6, 2012

Easy Superhero Bandit Mask Tutorial

Here is an easy and cheap DIY stocking stuffer idea for the little boys in your life! 
Materials: Card Stock, Felt, & 11" Thin Elastic

Directions: Cut out desired mask shape from card stock. If you are not confident in your mask creating skills, you can find Free Mask Templates HereFollowing your template, cut two identical felt pieces. 
Pin the felt pieces to each other, with one end of the elastic pinned into the side (tucked between the layers), just above the eyes. 
Sew around the eyes and the edge, leaving an 1/8" seam. Be sure to back stitch a lot when going over the elastic to secure it.

Sew all edges except the opposite side where the other elastic should go in. Now pin the other end of the elastic into the opposite side of the mask, and sew it into place. Don't forget to back stitch a lot here! 

That is it! :)

'The Atom' Cape & Mask
I was inspired by this mask by Udder.

Now make a bunch in all different colors! Have fun!
Sylvie


Christmas Wrapping & DIY Gift Tags

I've been busily shopping and wrapping... building this stack that has my kids eyes sparkling! 
For the name tags on each gift, I just printed a deer silhouette from a Google Image search, cut it out and traced it onto Christmas card stock, 
cut them out, and punched a hole in the top!  
I stacked up my card stock and cut many at a time!
It is such a cute and cheap way to add some fun to your gifts!

Have fun!
Sylvie


Monday, December 3, 2012

Tee Shirt To Girls Maxi Skirt DIY

Not the best pics, but you get the idea...

Using this tutorial, I turned one of my old shirts into a lil maxi skirt for one of the lil Livs.
The only thing I did different was the actual measurements (obviously). :) 
I measured her waist, and from her hip to foot.  It was super easy and fun!

Thanks for reading! 
Sylv

Friday, November 30, 2012

Easy Homemade Donut Hole Recipe

I may or may not have made the world's best banana bread, 
and donut (doughnut?) holes in the same day... you'll never know! ;)

These are super easy to make, I actually made them while I made dinner! The rice was cooking, the gravy was simmering, the veggies were steaming... All the healthyness going on in my kitchen! So I had the urge to whip these out. And I'm sure glad I did! :)

Easy Donut Hole Recipe

Ingredients:
1 1/4 cups White Flour
2 tsp. Baking Powder
1/4 tsp Salt
1/2 cup Milk
1/2 tsp. Vinegar
1/4 cup Sugar
3 Tbsp Butter, melted
Optional: Sugar, Powdered Sugar, Cinnamon, Cocoa... for coating
2-3 cups frying oil (vegetable, canola...)

Directions:
Pour oil into fryer and set at 350 degrees. In a medium sized bowl, whisk together flour, baking powder, and salt. In a separate small bowl, whisk together milk, vinegar, sugar, and butter. Pour the liquid mixture into the flour mixture and stir until just moistened. Do not over stir. Using a cookie scoop/ melon baller, drop balls of the dough into the heated oil. Fry for 3-4 min, or until golden brown, and then flip them over and do the same for the other side. Keep a close eye on them as not to over cook them! Remove from the oil and place on a paper towel to drain. Roll them in coating of your choice while they are still warm. Serve fresh.

Enjoy! 

Sylvie


Thursday, November 29, 2012

Warm Boys Dress Pants

I made these fully lined boys pants with back pockets!
I love a free pattern and these were easy to make, 
so I thought I'd share em with ya! :)

Thanks for reading!
-Sylvie

Wednesday, November 28, 2012

Finally Another Lamp!


It's been pretty quiet here on the blog... 
I've been spending time with family, and adding new items to the Shop
Isn't the metal wire lamp lovely!? I have one in my craft room, and I sure love it!
If you like it, scoop it up quick! Mr. Liv makes them by hand, and he doesn't make them very often!! 
I've also added a new bag with a doily on it! :)
burlap purse with bow adjustable strap coffee bag fully lined with blue and brown print with doily

Come check out Sylvie Liv shop, and nab these lovelies before they'e gone! :)

-Sylvie

Tuesday, November 20, 2012

New Holiday Items In The Shop!

Brown and Oatmeal Tan Felt Flower on Cork Wall Hanging Decoration
simple burlap christmas stocking with cream wool felt flower lined with white cotton
christmas garland wool felt circles and vintage paper circles in red green and gray

Be sure to check out the SylvieLiv Shop for our new Christmas decor, and for Holiday gift ideas! :) 

We also will be adding more lighting soon! :)

Have a good week!
-Sylvie

Friday, November 16, 2012

Awesome Craft Sale Today In Brighton MI!!!!!

It is here! Today is the day of the Design Junction Craft Sale!
Seriously guys, this sale rocks! 
There is something for everyone...
The prices are very good...
Don't miss out!!
There will be door prizes!
Admission is free!!
Really, there is some serious talent showcased in this sale! 
Try some delicious home baked treats!
Hope you can make it!
Also going on in downtown Brighton today is the Holiday Glow Festival!

Saturday, November 17, 2012
Open From 10am- 6pm
Brighton Community Center
555 Brighton St.
Brighton, MI